Samuel Edusa MD
How to deploy a React App to Github Pages
Samuel Edusa | Aug 10, 2022
In this short tutorial I will show you how I went about creating a React app and deployed it to Github Pages (a free web hosting service provided by Github). I used
Create React App (a tool used to build React applications from scratch) and gh-pages (an npm package that makes deployment to Github Pages pure bliss).
Prerequisites
- You need to have Node.js and npm installed on your computer. These are the versions I will be using for this tutorial (you don't have to have the same versions btw).
$ node --version
v16.11.1

$ npm --version
8.0.0
Personally, I use nvm (a version manager for node.js that allows you to quickly install and use different version of node via the command line).
- You should also have
Gitinstalled. The version I will be using is:
$ git --version
git version 2.37.0 (Apple Git-136)
- You should have a Github account or set one up.
Steps
1. Create an empty Github repository
- Sign into your Github account.
- Create a
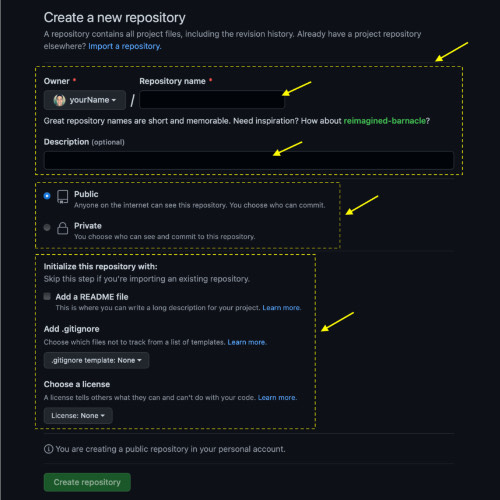
new repository(you can find the create a new repository here. Screenshot of the form shown below

- Fill out sections of the form as follows:
- Repository name: You can use any name you want, e.g. portfolio (that's what I chose), my-personal-page, etc.
- Repository privacy: Select Public. NB: For Github Free users, the only type of repository that can be used with GitHub Pages is Public. For Github Pro users (and other paying users), both Public and Private repositories can be used with GitHub Pages.
- Initialize the repository: Just leave this as is (don't check the box or make any drop down selections). Doing this will create an empty Github repository rather than pre-populate it with a
README.md,.gitignoreand/or aLICENSEfile.
- Submit the form.
Your GitHub account should now contain an empty repository with the name and privacy setting you requested.
2. Creating the React App
- Create a React App and name it
sedusa-githubio(this is the name I chose but you can choose whatever name you want. Just make sure you replacesedusa-githubiowith whatever name you choose in your project) by running the following terminal command:
$ npx create-react-app sedusa-githubio
This command will create a new folder named sedusa-githubio, which will contain the source code for the React app.
- Enter the folder for
sedusa-githubio:
$ cd sedusa-githubio
- Install the
gh-pagesnpm package
- Install the
gh-pagesnpm package as a development dependency
$ npm install gh-pages --save-dev
The gh-pages npm package is now installed on your computer and the React app's dependence upon it is documented in the React app's package.json file (seen as a property of devDependencies).
{
  ...
  "devDependencies": {
     "gh-pages": "^4.0.0"
  }
}
- Add a
homepageproperty to thepackage.jsonfile.
-
Open the
package.jsonin a text editor (I use Visual Studio Code. -
Add a
homepageproperty in the following format:
https://{username}.github.io/{repo-name}
NB: For a project site that's the format. For a user site, the format is: https://{username}.github.io. You can read more about the homepage property in the https://create-react-app.dev/docs/deployment/#github-pages section of the create-react-app documentation.
{
  "name": "sedusa-githubio",
  "version": "0.1.0",
  "private": true,
  "homepage": "https://sedusa.github.io/portfolio",
}
- Add the deployment scripts to the
package.json
- Open the
package.jsonfile in your text editor. - Add the
predeplyanddeployproperties to the scripts object. NB: Thepredeployscript is used to bundle the React application and thedeployscript deploys the bundled file.
{
  "scripts": {
    "predeploy" : "npm run build",
    "deploy" : "gh-pages -d build",
    "start": "react-scripts start",
    "build": "react-scripts build",
    "test": "react-scripts test",
    "eject": "react-scripts eject"
  },
}
- Add a
remotethat points to the Github repository
- Add a remote to the local Git repository by doing:
$ git remote add origin https://github.com/{username}/{repo-name}.git
NB: Replace {username} with your GitHub username and {repo-name} with the name of the GitHub repository created in Step 1, e.g.
$ git remote add origin https://github.com/sedusa/portfolio.git
- Deploy the React app to Github Pages
- Deploy the app to Github Pages by running the command:
$ npm run deploy
This command will cause the predeploy and deploy scripts defined in package.json to run. Under the hood, the predeploy script will build a distributable version of the React app and store it in a folder named build. Then, the deploy script will push the contents of that folder to a new commit on the gh-pages branch of the GitHub repository, creating that branch if it doesn't already exist.
By default, the new commit on the gh-pages branch will have a commit message of "Updates". You can specify a custom commit message via the -m option:
$ npm run deploy -- -m "Deploy my awesome app to Github Pages"
GitHub Pages will automatically detect that a new commit has been added to the gh-pages branch of the GitHub repository. Once it detects that, it will begin serving the files that make up that commit — in this case, the distributable version of the React app — to anyone that visits the homepage URL you specified in the package.json (Step 4).
At this point, the React app is accessible to anyone who visits the homepage URL you specified in Step 4. For example, this React app is accessible at https://sedusa.github.io/portfolio.
Time to celebrate! The React App is now live on Github Pages 🙌🏽

Code
Here is a link to the code for this deployed app.